2003 Subaru Baja EV Conversion
I am trying to turn my 2003 Subaru Baja into an EV. The world of DIY EV-conversion is a lot more advanced than I originally imagined it was.
The Plan
My Baja has the base, non-turbo engine paired to a 5-speed manual transmission. That spec gives it a curb weight of 3,460 pounds.
At the end of the day, when I'm done with this car, I decided to give myself the following requirements.
1. Range on a full charge
A full charge should allow me to drive to and from any errand I'll need to run within the city. To try to figure out what a good number for desired range ought to be, I took a look at google maps and picked out the furthest interesting thing I could find from my house that still looked like it was somewhat within Austin city limits, which for me ended up being the Ladybird Johnson Wildflower Center which, now that I look at it, I feel like I have to go visit now. That's about a 25 mile drive away from where I live, so a 50 mile round-trip. Of course, it'd be nice to build in some safety factor there.
The fuel tank on the Baja is around 17 gallons or so, and has a combined 20 MPG rating from the EPA, implying a current range of about 340 miles. Modern engines are about 30% efficient, so we can calculate an upper bound on the energy required to move the car that many miles.
Gasoline's volumetric energy density is about 33.2kWh/gallon, so that means a completely full tank has about 563.6 kWh in it. 30% of that is 169kWh to move the car 340 miles. My desired range is at least 50 miles, so my energy need is at least 24.7 kWh. Assuming an electric powerplant efficiency of about 90 percent, which is very achievable with electric motors, that means I should look for about 27.5 kWh of total storage.
Note, I have not tried to account for drivetrain or wind-resistance losses in this very rough calculation. Mainly because I think it ends up already being factored out if you just consider efficiency from input->powerplant output.
With all these in consideration, I ended up buying 6x 5.3kWh Tesla battery modules on ebay (it's pretty neat what you can find on the internet). The guy I bought them from was very friendly and pointed me to the Vero BMS system. If you're looking to do buy a bunch of Tesla batteries for whatever reason, look up evracing on ebay
2. Acceleration
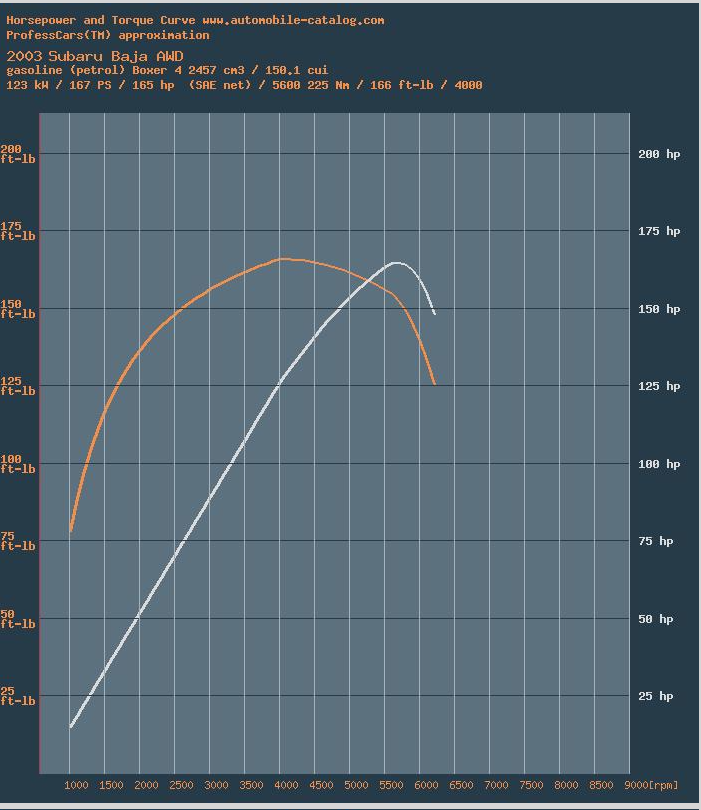
One major complaint I have about my naturally-aspirated engine is that it's just extremely underpowered and just cannot move my car very well from a dead stop. It does not develop any useful torque until around 3000 RPM, and takes forever to get there (see the chart below).
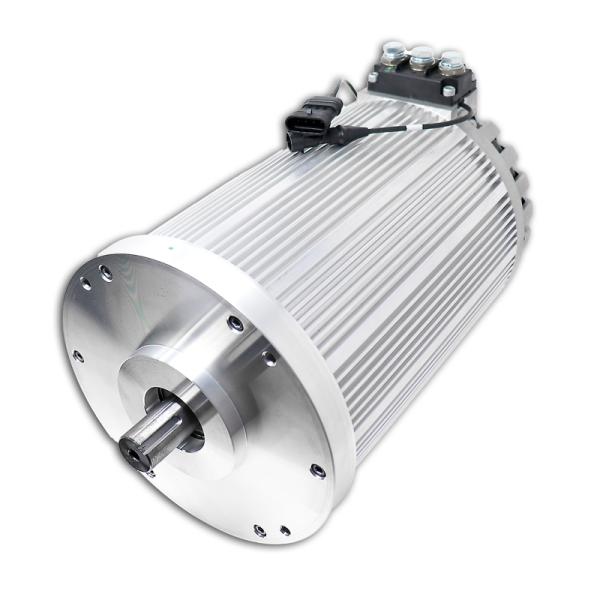
In the torque band, the throttle feels responsive enough, so I don't really care to increase my peak power or torque figures. All I really want is a powerplant that has a flatter torque and power curve, so that's how I decided to size my motor. In the end, I decided to go with the NetGain Hyper9 X144
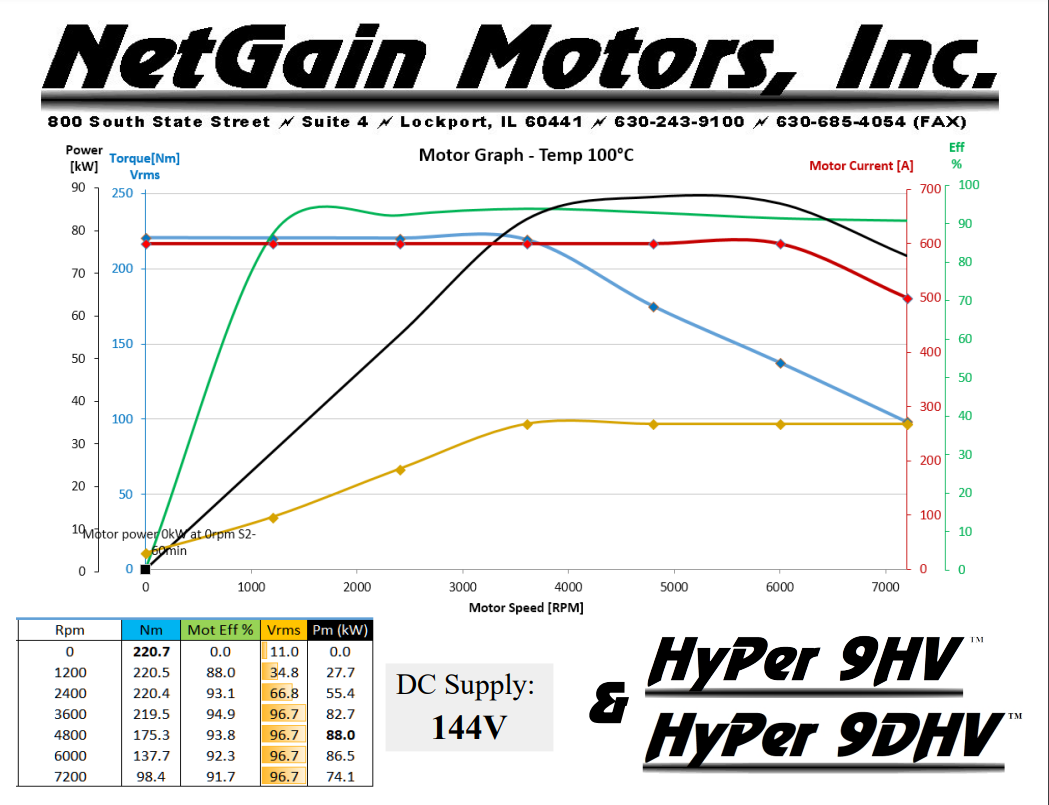
Looking at this motor's performance curves below, already we can see the fruits of electrification. Peak torque is developed instantly, even at 0RPM. If we convert everything to metric, peak torque for the Subaru engine is about 223 N-m. That's actually slightly higher than the peak torque of this motor, which is 220 N-m, but since all that torque is developed almost instantaneously, and it can maintain this output at high efficiency, I'm more than happy to take that very slight knockdown in peak torque.
3. Other Accessories
There are a bunch of other things that factor into the build that all have to do with managing the power of the batteries and the motor so that I don't burn down my garage in an unmanageable lithium fire. To describe everyting to a T would mean that I'd need to actually sit down and write out some kind of technical manual describing how to do so, but the thought of doing that honestly makes my brain hurt, so maybe I'll try explaining it bit by bit.
BMS
Once the battery is selected, it's only natural to then pick out a battery management system. What might be surprising to some people is that you can essentially think of the battery modules in a car as just a very very big pack of regular AA batteries, all wired together to create the voltage and current output required by whatever car they're powering. In fact, you can see how the cells are all arranged in this photo:
The BMS is essentially responsible for making sure every single one of those cells is healthy (enough) for normal operations. What you don't want is for enough of these cells to build up local charge imbalances (ex: a group of cells is at a much lower voltage compared to their neighbors, or vice versa) such that current starts "sloshing" around between them and causing what are essentially localized short circuits and heating events. If you have enough of this happening, that's how you get battery fires.
Well anyways, that's how I understand them, but I ain't no electrician. But I do know that I don't want my car or my house to catch on fire from this silly project of mine. The people I bought the battery from, EV Racing, recommended the Vero BMS V2, so I ended up getting one from here.
DC/DC Convertor And Pack Charger
Another potentially surprising thing about EVs is that most (if not all) still have and make use of the seemingly anachronistic 12V lead-acid batteries. But it actually makes quite a bit of sense. While the driveline of the car may operate at the high voltage of the battery pack, there are a ton of systems on the car that still operate at much lower, saner voltages. Do you really want a 300V dome light frying your retinas every time you need to find the french fry you dropped between the seat and the shifter?
A bunch of automotive components were designed and built with the 12V system in mind, such as the headlights, indicators, etc. So it just makes sense to provide a 12V system to power all the legacy equipment.
In internal combustion engines, the engine drives a small generator (which is called the alternator for some reason) which is used to power the 12V electronics and recharge the lead-acid battery. In the EV conversion, this is all replaced with the DC/DC convertor and low-voltage battery charger, for which I'm using this thing This is a component that seems to be made directly by the folks at FlashDrive Motors, and they've assigned it the product code CD-MF04.
As a footnote: this device also charges the main battery pack. Which is neat.
The General Plan
An EV conversion is conceptually simple: rip out the engine and all the fuel related components, and in their place, stick in the batteries and electric motor. Where the new components go should A: make sense and B: not affect the original weight and balance too much.
On my donor car, the engine, an EJ25, weighs about 300 lbs. The gas tank, when full, I reckon weighs around 120 lbs. The motor I'm getting weighs around 130 lbs, and each battery module alone weighs about 55 lbs.
Taking this into consideration, I'm going to stick about 3 of the modules where the fuel tank used to go, and then everything else in the engine bay.
The Build (so far)
The Teardown
There are two major phases to this part of the build: removal of the engine and removal of the fuel tank. I decided to start with the removal of the fuel tank because I couldn't find as many notes about it on the internet, and I have a bad habit of starting with the tasks that I think are tougher so I can save the "easier" ones for later.
I was worried as to whether or not I'd have to drop the subframe in order to get the tank out, as that is what some forum posts suggested. This car had given me issues with suspension fasteners in the past. When I tried to replace the rear struts back in the day, the lower strut bolts were frozen solid, and I resorted to hacking them up with an angle grinder after all my gentler efforts of persuasion failed.
After reading enough vague 2-sentence forum posts where some guy would just say "ah no worries, you can get it out by just wiggling it enough", I'd built enough false confidence to at least begin trying. And it started out well enough. Removing the exhaust was pretty easy, as was removing the main propshaft and rear differential in order to give me access to the tank. The tank itself is an oddly-shaped vessel (almost organic looking) held in place by a couple of straps, which I was able to undo.
Once all that crap was out of the way, it was time to start wiggling. And wiggle I did. I wiggled with all my might. I wiggled it up, I wiggled it down, I wiggled it to the left, and I wiggled it to the right. But no matter how much I wiggled it, it refused to come out. I saw a YouTube video where a guy was able to get this tank out with the wiggle technique, but admittedly, it was for a different model of subaru. The Baja, though the pinnacle of small truck design, was sadly not a very popular model and did not sell well in the land of conspicuous consumption and overcompensatory buying habits.
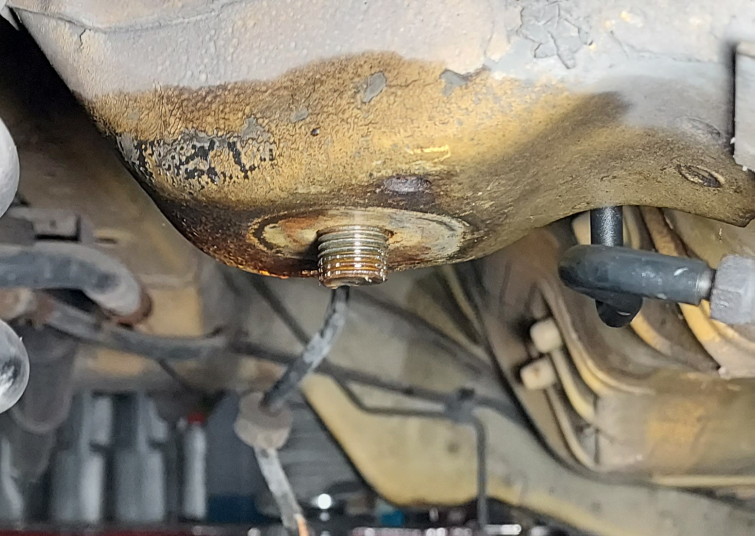
Alright. Well, shit. I guess it's time to drop the subframe, then. The subframe is held on the chassis by 4 14-mm bolts:
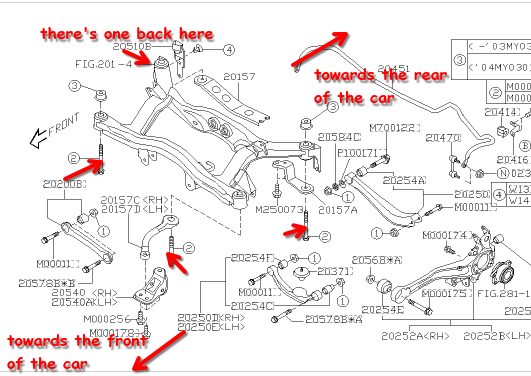
The two bolts towards the rear of the car came out just fine, but Jesus H Christ I don't know what they used to drive in the two bolts towards the front of the car. They just would not budge. I sprayed them with penetrating oil as best as I could (access was terrible). Heating was out of the question because A: I didn't have a blowtorch and B: the part of the bolt I needed to heat up was deep inside the chassis of the car, whereas I only had access to the head of the bolt. Oh, and C was the fact that this was right next to the fuel tank, and I don't really trust my aim with a blowtorch. So, without really thinking about what terrible things might possibly happen, I decided to just go unga bunga mode, made a 3-foot long cheater bar, and started rowing on those bolts, starting with the right side.
Even with the 3-foot cheater, it was work getting that damn bolt to turn even just one click on the ratchet that I was using. With each heave of the bar, it would let out a terrible cracking noise and bits of rust and dirt would fall to the floor. Several times I stopped and googled more videos and forum posts just to make sure I wasn't irreversibly fucking up this car and turning it into a pile of junk. Unfortunately, I couldn't find anything compelling enough to convince me to try to think of doing something else. The monkey brain had taken over and had became fixated on just pulling the lever to see what happen next.
Well, what happened next was utterly too predictable. There was a crack much louder than all the previous ones, and the bolt suddenly began to turn suspiciously more smoothly. When I finally pulled it out, it was exactly what I feared: it had snapped. And so began a very, very terrible ordeal that lasted me a whole 3 months.
That fuckin' bolt
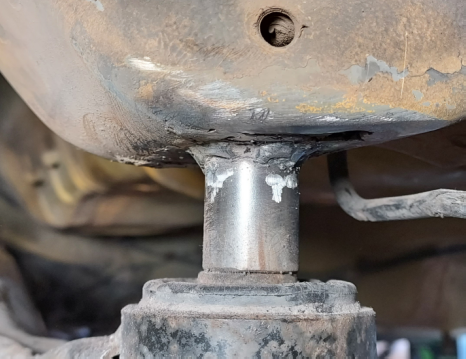
Mercifully, I was able to get the last bolt on the left side out as well, although that one also put up a terrific fight. So I was left with just this bolt on the right side. After reading some forum posts, I decided to do the easy, foolish thing and drilled out a big hole in the center of my stuck bolt and bought a 5/8" bolt extractor. I then stuck that on the end of my breaker bar and pulled as hard as I could.
Obviously, I don't learn from my mistakes. I should have slowed down at some point and realized that I was doing exactly the same thing that got me into the mess I now found myself and was expecting it to somehow not only not happen again, but somehow reverse the course of what I did and put everything back to normal. Like pulling out my teeth in order to get rid of a toothache.
Well, d'uh, the extractor broke off inside the bolt. What's worse, the fracture plane was flush with the surface of the surrounding metal, meaning I couldn't get a pair of pliers on whatever was exposed and hope to fish it out.
This is where I basically gave up, for a good long while. There were other forum posts saying that you maybe sorta coulda maybe get away with only have 3 out of the 4 subframe bolts securing it to the chassis, but I couldn't bring myself to be comfortable with that thought, regardless of how correct that might be. Yet, I had no idea how I'd be able to proceed with things the way they were now. I tried drilling the extractor out, but it was made of much harder metal than the bolt, and my bit just skidded all over the surface.
So I did what any man of action does when the way forward is unclear: I ran away and tried not thinking about it. I did this for about three months, where I'd occassionally have the thought "hey, I should do something about this", only to immediately answer myself with "naaah, I'll do that later".
I couldn't avoid it forever, though. I mean, it was an entire car just sitting in pieces in my garage, just taking up space. I finally decided fuck it, I'm just going to leave that bolt there, and I'd essentially weld a long nut over it. I've never welded anything before, though. And scrolling through Weldtok, you'd think that it was an esoteric, arcane art that should only be attempted by the ones who are worthy. They aren't wrong, but at the same time, it's still quite easy to make disgusting welds that at least hold things together, and that's all I needed. There's a metal supplier in Austin, Westbrook Metals that everyone should know about. They let me pick a 1-foot piece of mild steel from their drop zone and didn't even charge me for it. I cut off about a 1.5 inch section of it and drilled and tapped a 14mm x 1.5 thread into it, and welded it over the bolt.
This... went a lot smoother than I thought it would, and it was gratifying to see that everything lined up with the subframe. I still had a little bit of cleanup to do here, though.
The subframe doesn't sit directly on the chassis, instead it's supposed to sit on an aluminum spacer that goes between the two of them. Because of that weld bead on the nut, however, that spacer was unable to sit flat with the chassis like it's supposed to, so I made a custom "washer" with a large chamfer on it to make room for the weld bead to fit inside.

I was able to knock that out pretty quickly, though, and I was pretty happy with the way things turned out. This wasn't perfect, and who knows how well this setup would hold up over regular usage of the car? That being said, I just wanted to move on with my life on this project. Reassembling the rest of the rear end took about two days for me to do, mostly wrestling with getting all the suspension links reconnected to the subframe (what a pain), and remounting the rear differential. But after I did that, I declared this chapter of the build over.
What's Next
At this point, I've catalogued pretty much everything worth talking about in this build so far, so I'm going to switch formats from this overarching expository style to a blog format. You can catch up on that here.