

I've been spending the past few days putting together the battery boxes for the Baja. It's taken me a lot longer of a time to put these things together because designing and building them turned out to be waaay more complicated than I thought they'd be. I had to think pretty hard about a lot of things before I pulled the trigger on actually buying materials and building these things.
It might help to start with explaining how I want to mount these things in the first place. To try to preserve the original weight and balance of the car, I planned on mounting 3 in the back on the underside of the car, and 3 in the back where the engine currently is.
The 3 in back would be subject to puddle splashes and kickback from loose rocks and grovel, not to mention a heck a lot of bouncing and vibrations from the normal course of driving and being mounted so close to the suspesion. Yet, I'm not working with a lot of space, the batteries are heavy, and I need to be very careful that if I decide I want to build the battery boxes out of metal, that I provide plenty of safety against the battery terminals accidentally shorting themselves against the walls of their enclosures and setting fire to my house.
As of now, I've (mostly) finished designing the box that will hold 2 battery modules and have started building it. You can see the design here, or if you don't have an OnShape account, it looks like this:
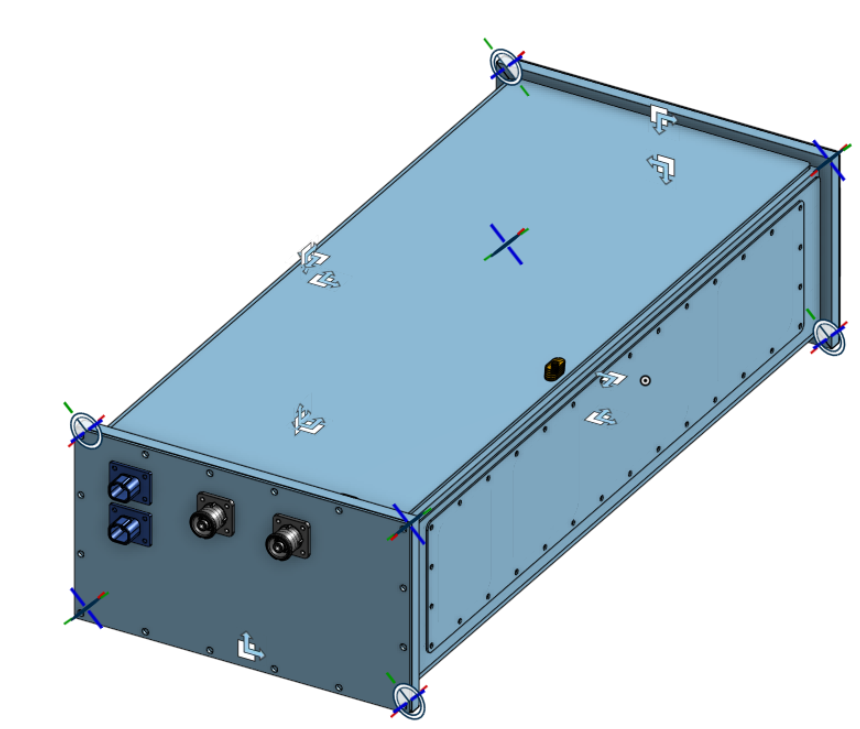
There's nothing very special about this, but I can talk about some technical details about it that might be helpful for anyone else who'd want to build their own battery boxes, because buying custom-made ones from elsewhere can easily run thousands of dollars.
Overall Materials
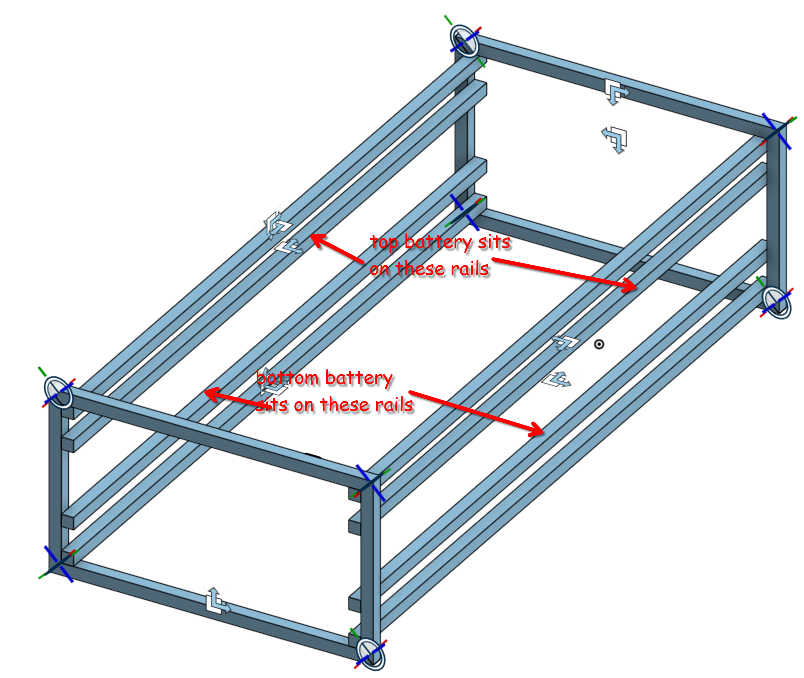
The box itself is essentially a frame built out of 1/2" square steel tubing, and paneled with sheets of 16 gauge sheet metal; everything is made of mild steel. The diagram below shows just the framing, as well as where the batteries are intended to sit:
Battery Mounting
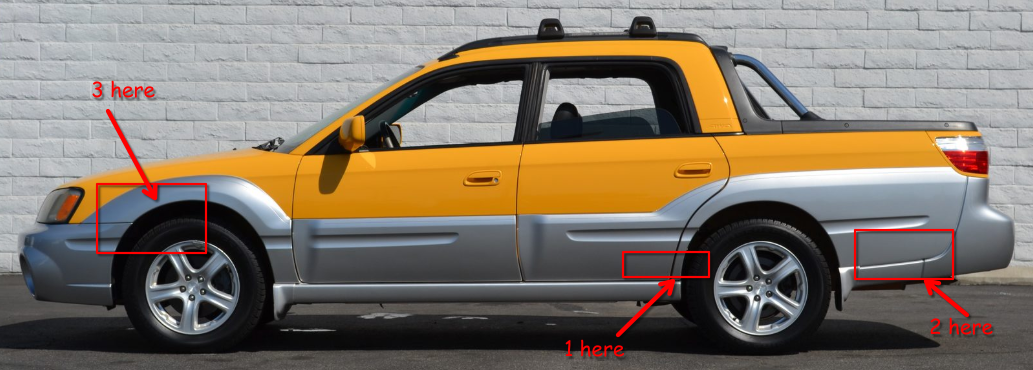
The diagram above shows that the batteries will be arranged one on top of the other, but from scrounging random internet forums, it appears that they're designed to be fully supported from the little garolite "ears" that protrude out of the sides of each module (highlighted below):

Additionally, when these modules are installed in Tesla cars, they're designed to have just a little bit of clearance above and below them, so these ears are also designed to fully absorb road vibrations and any up-and-down impact loading may occur from regular driving.
I don't know what the ramifications are of directly stacking these modules on top of each other, but I figured why take the risk and designed the boxes to also allow the modules to be mounted with a little bit of clearance above and below them.
Finally, in order to lock the modules to their mounting rails, the ears on each module have holes/slots cut out in them for fasteners to go through, so I just drilled matching holes in their mounting railes to accommodate a bolt/nut combination. I drilled out my holes to accommodate 10-32 x 3/4" bolts, and I found these nice, low-profile weld nuts from mcmaster to fasten them on the other side. Because of the limited amount of working room, I opted to avoid using any washers at all and bought a bunch of flanged bolts.
Coolant Distribution
Each battery module also has a pair of hose barbs on the backside that allow coolant to flow through the pack. Each module needs to be hooked up directly to the coolant supply and return. I wanted to keep things "neat" and only need a single pair of connections to hook up both modules to the coolant supply/return lines that will be running through the car. This ended up taking me a long time to design out because I was really worried about the following things:
- The boxes were designed to be watertight. If any internal leak sprung up, that would cause coolant to start pooling up inside and submerge the cells. To mitigate this, I would want to reduce the number of connections that would need to be made inside the box.
- All metal fittings and components in a coolant loop need to be made of the same material in order to avoid galvanic corrosion. Since I'm using Tesla battery modules, that meant all metal components needed to be made of aluminum.
Ultimately, that led to me going with this following design:
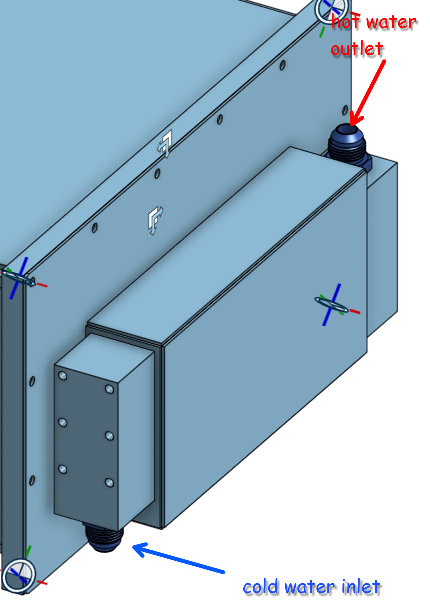
Water enters the box through an aluminum distribution manifold that has one inlet and 2 outlets, one for each module inside the box. A separate manifold collects hot outflow from each module and combines them into a single output that will connect to the main return line.
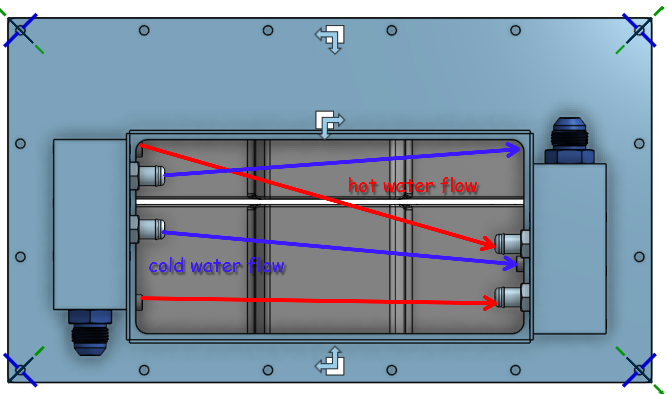
The manifold itself is just made out of a section of 1.5" x 1.5" aluminum with passages drilled throughout it. For the main inlet/outlet fittings, I used this part from mcmaster, and for the manifold-to-module fittings, I used these parts, which happily come in red and blue varieties.
Electrical
Each battery box will need connections for the high-voltage and low-voltage circuits. There's a shop in Austin called Flash Drive Motors that specializes in EV conversions, and they tend to use these Amphenol sur-lok connectors to make the high-voltage connections with. The page I linked should contain a link to their product brochure as well, but just in case, I've decided to serve it on my site here as well just in case that link goes dead. It contains information on how to assembly part numbers for yourself in case if you need to order connectors to-spec. For reference, these are the parts I ended up using:
- For the panel mount connectors: SLPIRCBPSO0
- For the cable connectors: SLPPC85BSO0
For the low-voltage connections, it took me a while before I stumbled upon the Deutsch connector system. I remember when I used to work on the octagrabber, these were pretty much the only electrical connections that could stand up to the beating we subjected them to in the North Atlantic. Everything else would rot away or become so extremely bound up with corrosion, but these little fellas always looked like brand new with just a little bit of dielectric grease.
You can buy these off of Amazon, but fuck Jeff Bezos, and I'm a proud man. I can find my own parts, thank you very much. Note that if you've never bought Deutsch connectors before, if you're buying them off of Mouser, you will most likely need to buy every part of the connector system. That is, not only do you need to buy the connector housings themselves, you also need to buy the individual pins that go inside the connector, sized for the wires that you intend to use, as well as the retaining feature that keeps the pins secured inside the connectors. Deutsch's trade name for these parts are called "Wedgelocks". I ended up ordering these from Mouser, and in the end, this is what my parts list ended up looking like:
- Receptacle housing for the box (you need 2x per box): DT04-4P-CL03
- Pins for the receptacle for the box (you need 8x per box): 0460-202-1631
- Connector housing for the cable that plugs into the box (you need 2x per box): DT06-4S-E008
- Pins for the cable (you need 8x per box): 0462-201-1631 (note, these are actually itty-bitty sockets that the pins on the receptacle slide into, but I'm just calling them "pins")
- "Wedgelock" retaining feature for the Deutsch connector system. You need 4x of these per box, and these go into both the receptacle and cable conectors: W4S-ZZ
You should be able to find all of these parts on mouser.com or Digikey or whoever your favorite supplier is. Heck, you might even be able to find these at the car store.